 This website is hosted on small ARM based computer called Raspberry PI. Raspberry Pi is Linux based PC with 800 MHz ARM CPU and 512 MB of RAM. Its performance can be compared to the modest smartphone available in 2013. The most interesting thing about Raspberry Pi is its price – 35$ for the board, and almost no power consumption.
Despite that CleanSoft in specialized in .NET development we decided to try out this idea and dive into Linux, PHP, MySQL world. Our goal was to create web server with as little maintenance required as possible and with full control over environment. Shared hosting environments are cheap but doesn’t provide control over operating system, cloud based hosting or dedicated server is too expensive to run website like this.
As you can see this site is up and works pretty fast so if you want to host you website on RPi details are in the guide bellow.
Hardware
Raspberry Pi is sold without power supply nor case so some additional hardware will be required. Here is full list of what we are using so far:
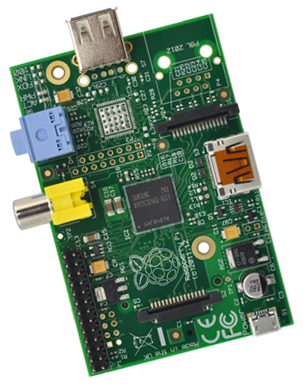
- Raspberry Pi model B – you can order board online from RS components.
- Transparent case – everybody want to have home, this will make you Pi feel safe.
- 4-port Powered USB hub – you can power you Pi from phone charger or get powered USB hub. We decided to get hub to make sure we have enough USB ports for our experiment (Pi has only 2). You can check list of compatible hardware – verified peripherals, powered USB hubs.
- 4 GB SD card – there is no HDD in this PC, it uses SD card to boot operating system.
- 250 GB External USB hard drive – its not required but we use HDD to back things up. As always with experiments you don’t want to lose your work.
There is no DVI or VGA connector on Pi, they are replaced by video-out and HDMI. So if you own USB keyboard and HDMI display you can work with Pi in traditional console way otherwise you can use SSH to connect to it remotely.
We are building a server so it needs 24/7 Internet connection. We decided to connect it to router using Ethernet cable. USB WiFi adapter will also work, although Ethernet connection proved to be more stable in our experiments.
Web server software installation and configuration
Operating system
First thing to install is Linux. We decided not get crazy here and select Linux adopted specifically for Pi and built by Raspberry Pi Foundation – Raspbian Linux. Please make sure you get default hard float version of the image – it will run faster and as everything default will be less painful to support. You can get image from Raspberry Pi Foundation, downloads page.
Next step is install Linux image on SD card. Official Easy SD card setup guide covers it pretty well. After SD card is setup its time to start your Pi.
Remote access and network configuration
We are using remote SSH access instead of keyboard + HDMI. By default SSH daemon is enabled and will be available on port 22. Your router need to have DHCP enabled to allow RPi to get IP address from it. You can find IP in the router list of connected clients or use network scanning tools. We have setup IP address reservation on our router to make sure IP will not change after DHCP lease will expire.
If you are under windows you can use Putty for SSH connections – Putty Download Page. Default credentials are – [Username: pi Password: raspberry].
If you router doesn’t support DHCP address reservation you can use this guide to set setup static IP address – Raspberry Pi static IP address.
Raspbian Configuration
First thing to run after you log in is raspi-config utility. It allows you to configure your Pi hardware and operating system.
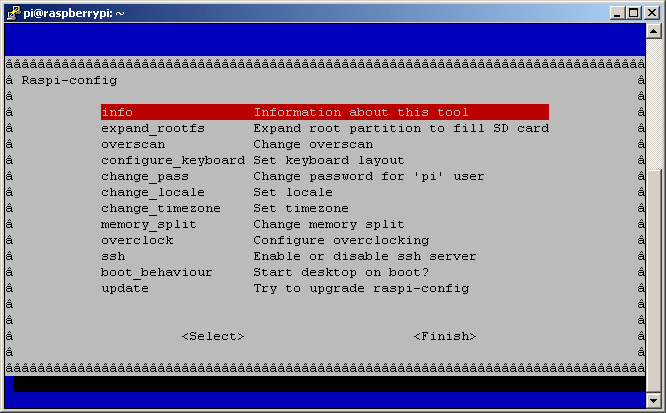
Options you want to visit are:
- expand_rootfs – enables use of all space available on your SD card instead of default 2GB
- change_pass – you need to change default password otherwise you will share you server with rest of the world
- change_locale
- change_timezone
- memory_split – you are going to run server and will not utilize powerful GPU RPi has, so you want to set this value to minimum – 16.
- update – updates your RPi software
- overclock – we have selected medium setting. This allows RPi to switch to higher CPU frequency when its under pressure and doesn’t void you warranty, however it may shorten your device lifetime Please make sure you do some research on this subject before enabling this setting – RPi config, overcloking.
We recommend to setup auto updates for Linux, you will not have to worry about patching your Pi. Downside of that is lack of control and risk of getting zero day security holes with latest version of software. Its up to you – more security or less maintenance effort.
To set this up you need to create executable file autoupdate.sh in /etc/cron.daily which will update Linux packages daily.
- sudo nano /etc/cron.daily/autoupdate.sh
- add this script to it and save
#!/bin/bash
# A script to run Aptitude and install any upgrades automatically.
# Add this to /etc/cron.daily to run the script every 24 hours.
# This prevents "TERM is not set, so the dialog frontend is not usable." error
PATH="$PATH:/usr/local/bin:/usr/local/sbin:/usr/bin:/usr/sbin:/bin:/sbin"
aptitude update
aptitude safe-upgrade -y
aptitude autoclean
- To make script executable run sudo chmod +x /etc/cron.daily/autoupdate.sh
If you are going to use external HDD with you RPi for backups we recorded to use ext4 file system. In comparison to NTFS file system, ext4 usage will consume much less CPU time.
To format drive as ext4 you need to find its device name:
sudo fdisk -l
Previous command should show you list of disk devices connected. You are looking for /dev/sdX, where X will be a-z. In all subsequent commands you need to replace sdX with your device name. You can use drive size to find right device.
Formatting HDD (deletes all data from HDD) can be done with same tool – fdisk. Tool is interactive and will ask you few questions about partitioning You should provide following answers if you need single ext4 partition:
- n [for new]
- p [primary]
- 1 [1st partion]
- enter [start]
- enter [end]
- w [write and exit]
Command to run to start format
sudo fdisk /dev/sdX
After drive is formatted you need to create new file system on it with this command
sudo mkfs.ext4 /dev/sdX1
You need to setup auto mount for your HDD. At first you need to create mount point.
sudo mkdir /media/usbhdd
Than edit fstab file to mount drive automatically after system starts up. Open file in text editor
sudo nano /etc/fstab
and add this line to the end of the file:
/dev/sdX1 /media/usbhdd ext4 rw,defaults 0 0
Now mount drive using this command
sudo mount -a
Install web server, PHP and database
To run WordPress you need to setup web server, PHP and database. In addition to that default set of software you will need some caching solution to make you website snappy.
- lighttpd – we selected this web server for easy of use and setup
- PHP – WordPress runs on it, not much to selected here
- MySQL – we don’t need any special capabilities here and will go with default
- Redis – used to cache web pages
To install necessary packages
sudo apt-get install lighttpd mysql-client mysql-server php5-common php5-cgi php5 php5-mysql lighty-enable-mod fastcgi-php redis-server
To make things easier you want to allow pi user to write to the www folder and also allow file uploads.
sudo chown www-data:www-data /var/www
sudo chmod 775 /var/www
sudo usermod -a -G www-data pi
Configure lighttpd web server
You need to edit configuration of lighttpd to enable PHP and prepare it for WordPress. You need to replace www.yourdomain.com with your RPi IP or real domain name your are going to use. Some directories are missing for now but they created after you install WordPress.
To edit config file:
sudo nano /etc/lighttpd/lighttpd.conf
To restart web server after configuration is changed:
sudo /etc/init.d/lighttpd restart
Configuration bellow will:
- Make WordPress work on a root of your website – www.yourdomain.com instead of www.yourdomain.com/wordpress.
- Enable redirect from yourdomain.com to www.yourdomain.com – this allows to prevent duplication in search engine indexes.
- Make URLs pretty and hide index.php from them. Take a look on the browser address bar for an example.
- Enables correct sitemap.xml serving to help search engines index your site.
server.modules = (
	"mod_access",
	"mod_alias",
	"mod_compress",
 "mod_redirect",
 "mod_fastcgi",
 "mod_rewrite"
)

server.document-root        = "/var/www/wordpress"
server.upload-dirs          = ( "/var/cache/lighttpd/uploads" )
server.errorlog             = "/var/log/lighttpd/error.log"
server.pid-file             = "/var/run/lighttpd.pid"
server.username             = "www-data"
server.groupname            = "www-data"
server.port                 = 80

index-file.names            = ( "index.php", "index.html", "index.lighttpd.html" )
url.access-deny             = ( "~", ".inc" )
static-file.exclude-extensions = ( ".php", ".pl", ".fcgi" )

compress.cache-dir          = "/var/cache/lighttpd/compress/"
compress.filetype           = ( "application/javascript", "text/css", "text/html", "text/plain" )

# default listening port for IPv6 falls back to the IPv4 port
include_shell "/usr/share/lighttpd/use-ipv6.pl " + server.port
include_shell "/usr/share/lighttpd/create-mime.assign.pl"
include_shell "/usr/share/lighttpd/include-conf-enabled.pl"
fastcgi.server = ( ".php" => ((
                     "bin-path" => "/usr/bin/php-cgi",
                     "socket" => "/tmp/php.socket"
                 )))

$HTTP["host"] =~ "^([^.]+\.[^.]+)$" {
  url.redirect = (
    ".*" => "http://www.%1"
  )
}

$HTTP["host"] =~ "www.yourdomain.com" {
  url.rewrite-final = (

    # Exclude some directories from rewriting
    "^/(wp-admin|wp-includes|wp-content|gallery2)/(.*)" => "$0",

    # Exclude .php files at root from rewriting
    "^/(.*.php)" => "$0",
    "^/(sitemap.xml|sitemap.xml.gz)" => "$0",

    # Handle permalinks and feeds
    "^/(.*)$" => "/index.php/$1"
  )
}
Installing WordPress
To download and extract latest version of WordPress please run
cd ~
wget http://wordpress.org/latest.tar.gz
tar -xvzf latest.tar.gz
sudo mkdir /var/www/wordpress
sudo cp -r wordpress/* /var/www/wordpress
To create database for your new website connect to MySQL with password you have set during installation:
mysql -u root -p
And execute this SQL after replacing <yoursecurepassword> with string of your choice
CREATE DATABASE wordpress;
CREATE USER wordpress;
SET PASSWORD FOR wordpress= PASSWORD('<yoursecurepassword>'″);
GRANT ALL PRIVILEGES ON wordpress.* TO wordpressuser IDENTIFIED BY '<yoursecurepassword>';
FLUSH TABLES;
exit;
Now we are going to create WordPress config from template. Next commands will copy config template and open it in text editor.
sudo cp /var/www/wordpress/wp-config-sample.php /var/www/wordpress/wp-config.php
sudo nano /var/www/wordpress/wp-config.php
Update database settings to point to your database
define('DB_NAME', 'wordpress');
define('DB_USER', 'wordpress');
define('DB_PASSWORD', '<yoursecurepassword>');
To make sure you website is secure you need to update few security settings with values generated by this page – https://api.wordpress.org/secret-key/1.1/salt/. Just replace default settings in your config by values generated on this page.
We are going to server pages from memory cache and skip most of the WordPress internal logic. This will prevent internal WordPress task scheduler do its job and plugins that relay on it. To fix this we nned to add this line to wp-config.php
define('DISABLE_WP_CRON', true);
This will prevent wp-cron function to be executed on every page load. Now we need to setup manual execution of wp-cron.php every 5 minutes.
sudo crontab -u www-data -e
This will open crontab file in default text editor. Please add following line to the end of the file to start WordPress task scheduler every 5 minutes.
*/5 * * * * wget http://www.yourdomain.com/wp-cron.php > /dev/null 2>&1
Page caching with Redis
We will modify index.php to enable Redis caching of all static web pages. This is slightly modified version of the code taken from here – How to load WordPress in a few milliseconds using Redis. This version does not allow not-authenticated used to reset page cache using browser refresh (F5). Without this script page load time will be 2-3 seconds, with it it will be 150 ms (after page is cached).
Important note here is that your cached versions of pages will not be invalidated when changes to the content are made. To remove all website cache go to http://www.yourdomain.com/?c=y while logged in. To remove single page cache you can got to the http://www.yourdomain.com/<pageaddress>?r=y.
cd ~
wget https://gist.github.com/samfromlv/5070820/raw/9b53a11f46b3dd7dda695a7a971c5828a9aaffa3/index-with-redis.php
wget http://uploads.staticjw.com/ji/jim/predis.php
sudo cp index-with-redis.php /var/www/wordpress/index.php
sudo cp predis.php /var/www/wordpress/
Downside of caching is that you will have to reset cache of the edited page or whole website after you make some changes. We reset whole website cache and use HTTP crawler to save all pages to the cache after some changes are made. You can get free crawler for windows here – HTTrack Website Copier.
Configuring WordPress
Go to www.yourdomain.com or IP address of your RPi. You should see WordPress configuration page with few settings. Fill them in, log in and go to your administration area to tweak few additional settings at /wp-admin/options-general.php.
You want to make sure that WordPress Address and Site Address are the same and set to – http://www.yourdomain.com to prevent /wordpress in the beginning of your URLs.
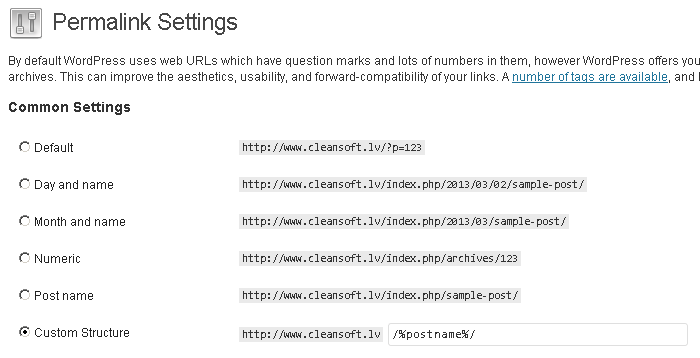
For nice URLs we recommend to enable custom permalink structure. With it enabled URLs look clean and we like clean things in software. Go to wp-admin/options-permalink.php and select Custom structure with %postname% entered after domain name.
WordPress Plugins
We use following plugin on our website to enable some useful features that WordPress doesn’t provide by default.
- BackUpWordPress – allows to schedule backups of WordPress directory and database. You can set it up to store backups in /media/usbhdd.
- Disable Comments – disables WordPress comments system for entire website.
- Disable Feeds – disables WordPress feeds system for entire website.
- Google Analytics for WordPress – enables Google Analytic tracking for all website pages.
- Google XML Sitemaps – automates generation of sitemaps to help search engines to index site.